
VTiger’s module layouts and fields are meant to be customized. Most often we change layout of a module based on client’s preferences or maybe because of some business requirements. No problem since we could easily customize module layouts and fields under Module Management settings; But what if your client needs a more complex functionalities? like dynamic fields? (show/hide fields based on another field value). Thought of some extension like VTiger dynamic fields?
There’s actually a lot of extensions out there like Conditional Layouts for VTiger that will help you configure your module layouts and fields. With this extension, you can hide field in VTiger module based on another field value.
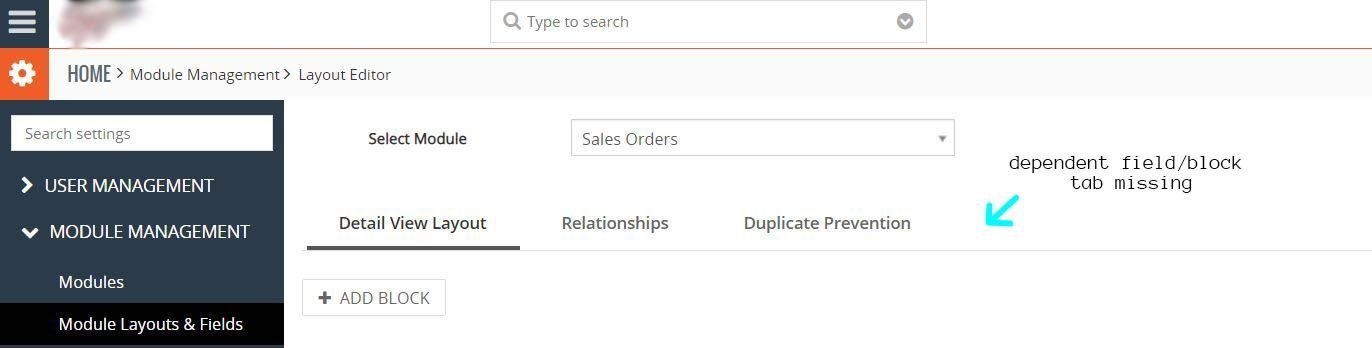
Another solution is to use the dependent field/block feature of VTiger. One problem, when we tried to navigate to CRM settings, Module Layouts and fields under Module Management , we can’t see dependent field/block tab. The only tabs displayed are Details View Layout, Relationships, and Duplicate Prevention. We thought that VTiger version 7.1 doesn’t have the dependent field/block feature. Found out that the VTiger version isn’t the issue, dependent field/block feature IS NOT implemented to the community version of VTiger.
Another option is Dynamic Blocks, an extension that will give you the capability to show or hide blocks based on picklist value.
All the options above we have given you require you to spend a dime to acquire them. Medium to big companies could surely afford to invest on those extensions from VTExperts. For small businesses or for some VTiger users who don’t want to spend $69 per month; if you’re willing to put an effort to create your own VTiger dynamic fields then continue to read. We will share you the steps to make module fields and blocks become dynamic using Javascript/JQuery.
Remarks
We’ll give you an example code in javascript to be modified and uploaded to your server. As an example, we will use Sales Order module to implement VTiger dynamic fields and blocks. You don’t need to worry since this tutorial is applicable to any module in VTiger.
This tutorial uses the latest version of VTiger CRM — VTiger 7.1. You may upgrade your VTiger CRM first before proceeding.
Remember that it is required that you have permission to create and modify your VTiger files.
Steps to Create VTiger Dynamic Fields And Blocks
Let’s create a little scenario here. When a user selects a value from a picklist element we will show/hide some fields and blocks.
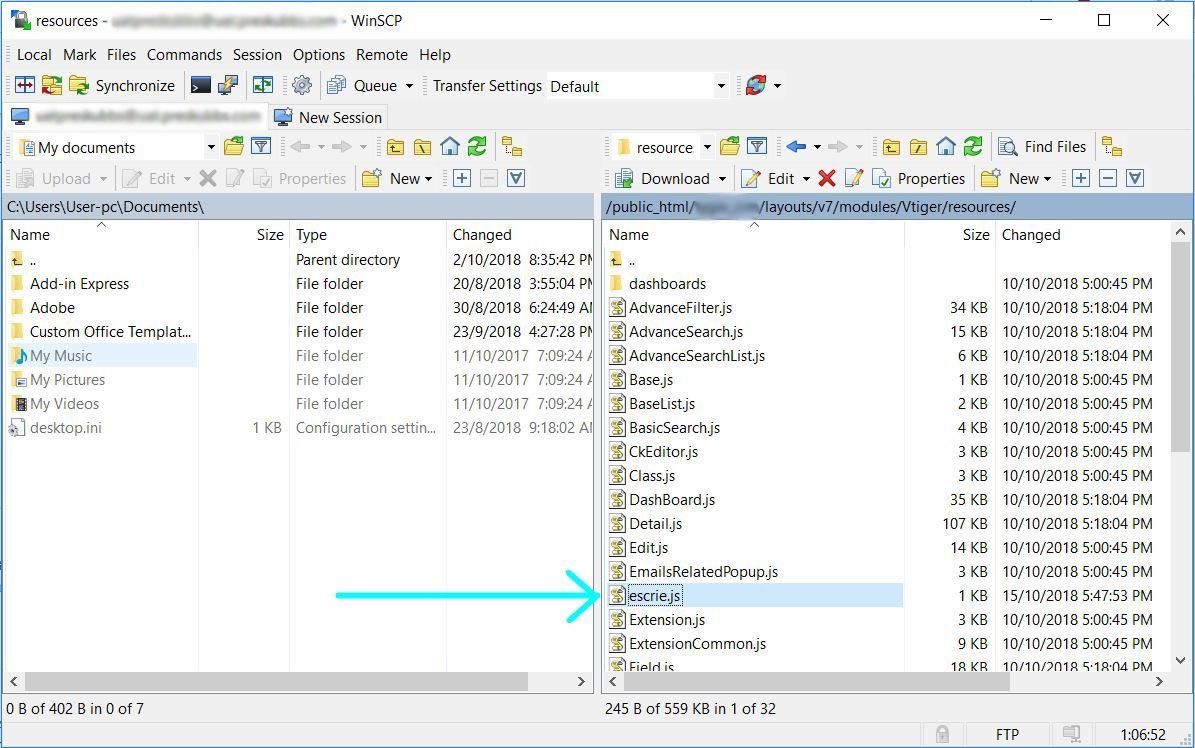
Step 1: Connect to the server where your VTiger CRM is hosted. You can do this using CPANEL or FTP solutions such as FileZilla or WinSCP (if you’re on Windows). Navigate to your-vtiger-crm/layouts/v7/modules/vtiger/resources directory and create your-javascript-file.js. See how we created the escrie.js file.
Step 2: Copy and paste the following javascript/jquery code to your newly created javascript file.
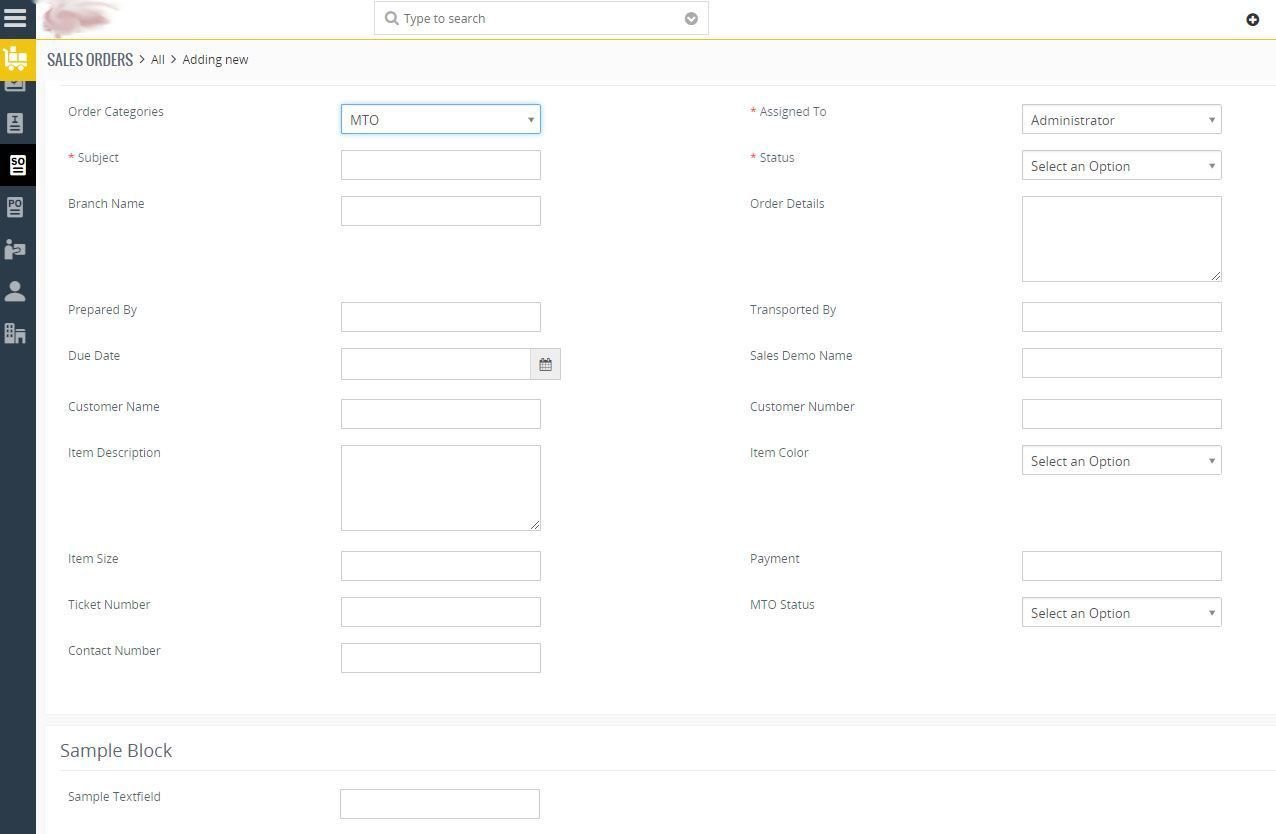
After selecting Job Order from Order Categories.
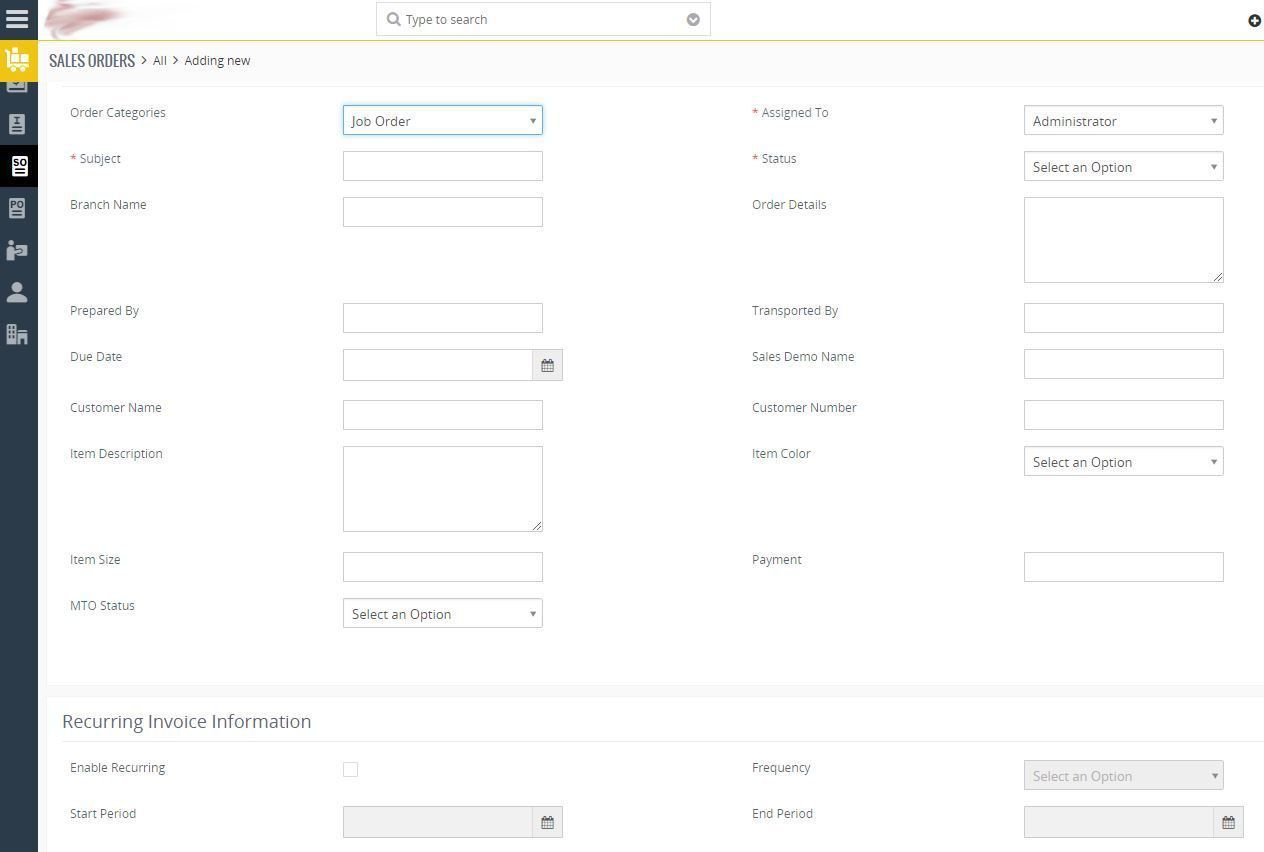
Notice that some of the fields and blocks disappear. Feel free to choose which SELECT ELEMENT you want to use — fields and blocks will depend on.
What We Have Learned
VTiger dynamic fields and blocks is a really helpful feature for us VTiger developers when creating fields or blocks with dependencies.
There’s a lot of existing solutions out there created by team of experienced developers such as VTExperts. You may choose paid extension to save time and avoid development works.
The solution that we have created here can be implemented on other VTiger version.
You may also want to read add contact to your VTiger CRM using VTiger API.
That’s all, we hope this tutorial about VTiger dynamic fields and blocks using javascript/jquery helped you create a free solution to show/hide fields and blocks in VTiger.
Great piece of work. I created escrie.js at the location that you specified and added the ID of my controls in the code however nothing happens. Not even the alert is shown.
What could be the issue?
I use version = 7.1
Great piece of work. I created escrie.js at the location that you specified and added the ID of my controls in the code however nothing happens. Not even the alert is shown.
What could be the issue?
I use version = 7.1
Hi,
I appreciate that you have posted this code free while there are hell lot of people who charge hefty sum for this.
The script works pefectly fine and it was my mistake actually. The input boxes can be disable but how do I enable/disable picklist ? I tried using the picklistElementsToHide but it doesnt work.
Hi Kapil Oberoi,
To enable/disable PICKLIST element/s in VTiger using Javascript/JQuery, you need to 1. Find the PICKLIST element first from your DOM. Then 2. Get your PICKLIST element DIV id (from your browser, inspect element, press Ctrl + Shift + I) and refer to the code below.
if (condition){
// disable click
$(“#s2id_autogen7”).css(“pointer-e gvents”,”none”);
// change bg color
$(“#s2id_autogen7 a”).css(“background-color”,”#EBEBE4″);
} else {
// enable click
$(“#s2id_autogen7”).css(“pointer-events”,”auto”);
// change bg color
$(“#s2id_autogen7 a”).css(“background-color”,”white”);
}
* PICKLIST element here in VTiger is not a SELECT element, it is an auto generated DIV tag that looks like a SELECT element.
I’ve got the same problem. What kind of mistake did you make?
Hi,
I appreciate that you have posted this code free while there are hell lot of people who charge hefty sum for this.
The script works pefectly fine and it was my mistake actually. The input boxes can be disable but how do I enable/disable picklist ? I tried using the picklistElementsToHide but it doesnt work.
Hi Kapil Oberoi,
To enable/disable PICKLIST element/s in VTiger using Javascript/JQuery, you need to 1. Find the PICKLIST element first from your DOM. Then 2. Get your PICKLIST element DIV id (from your browser, inspect element, press Ctrl + Shift + I) and refer to the code below.
if (condition){
// disable click
$(“#s2id_autogen7”).css(“pointer-e gvents”,”none”);
// change bg color
$(“#s2id_autogen7 a”).css(“background-color”,”#EBEBE4″);
} else {
// enable click
$(“#s2id_autogen7”).css(“pointer-events”,”auto”);
// change bg color
$(“#s2id_autogen7 a”).css(“background-color”,”white”);
}
* PICKLIST element here in VTiger is not a SELECT element, it is an auto generated DIV tag that looks like a SELECT element.
I’ve got the same problem. What kind of mistake did you make?
is this also available for vTier 6.3?
Hi Stefano!
Yes, script above for VTiger dynamic fields and blocks could be implemented on VTiger 6.3 (and on any VTiger version). You just need to be aware of VTiger 6.3 file structure. : )
Find the right path for VTiger resources to create your custom JavaScript file.
is this also available for vTier 6.3?
Hi Stefano!
Yes, script above for VTiger dynamic fields and blocks could be implemented on VTiger 6.3 (and on any VTiger version). You just need to be aware of VTiger 6.3 file structure. : )
Find the right path for VTiger resources to create your custom JavaScript file.
Hi
Great work, it hides the block from edit page, how do i hide from Details page as well?
Hi Faye,
To be able to hide block from your DETAILS PAGE, you need to identify the block you want to hide first. From your browser, inspect element (right click and select “Inspect” or press Ctrl + Shift + I). Here’s an example, notice that we’re using “data-block” value as identifier here.
if(condition){
$(“div[data-block=’your-block-identifier’]”).hide();
}
Hi
Great work, it hides the block from edit page, how do i hide from Details page as well?
Hi Faye,
To be able to hide block from your DETAILS PAGE, you need to identify the block you want to hide first. From your browser, inspect element (right click and select “Inspect” or press Ctrl + Shift + I). Here’s an example, notice that we’re using “data-block” value as identifier here.
if(condition){
$(“div[data-block=’your-block-identifier’]”).hide();
}
Thanks for the article, it was very helpful.
Thanks for the article, it was very helpful.
I tried to use the code but I cannot see anything. Even when I uncomment the alert, it didn’t appeared showing the choice. I’m using Vtiger 7.1. Do I have to enable something additional in order to check?
Hi Carlos Tapasco,
Can you verify if the newly created JavaScript file could be loaded properly within your VTiger module? To check, go to your browser and inspect element (right click then select “Inpect” or press CTRL + Shift + I). Navigate to “Elements” tab, press CTRL + F to search your script.
I tried to use the code but I cannot see anything. Even when I uncomment the alert, it didn’t appeared showing the choice. I’m using Vtiger 7.1. Do I have to enable something additional in order to check?
Hi Carlos Tapasco,
Can you verify if the newly created JavaScript file could be loaded properly within your VTiger module? To check, go to your browser and inspect element (right click then select “Inpect” or press CTRL + Shift + I). Navigate to “Elements” tab, press CTRL + F to search your script.
thx is so helpful!!…
I try change hide/show for prop(data-required, true) or attr(‘data-rule-required’, true);.. but i cant set as “mandatory”.. some idea for it?
thanks again
thx is so helpful!!…
I try change hide/show for prop(data-required, true) or attr(‘data-rule-required’, true);.. but i cant set as “mandatory”.. some idea for it?
thanks again
Hi Carlos, Very interesting your post. If you are interested, I would like to tell you that I have created a VTiger Open Source forum at Telegram. The purpose of the forum is to give support to users who have doubts and propose solutions (such as the one you have raised in your post).
https://t.me/vtiger7crm
Hi Carlos, Very interesting your post. If you are interested, I would like to tell you that I have created a VTiger Open Source forum at Telegram. The purpose of the forum is to give support to users who have doubts and propose solutions (such as the one you have raised in your post).
https://t.me/vtiger7crm