
[av_codeblock wrapper_element=” wrapper_element_attributes=” codeblock_type=” av_uid=’av-kldmxxfb’ custom_class=’cust-codeblock-ads1 mb-small’]


[/av_codeblock]

[av_textblock size='' font_color='' color='' av-medium-font-size='' av-small-font-size='' av-mini-font-size='' av_uid='av-2go423y' custom_class='' admin_preview_bg='']
[av_breadcrumbs]
[/av_textblock]

[av_one_half first min_height='av-equal-height-column' vertical_alignment='av-align-middle' space='no_margin' custom_margin='aviaTBcustom_margin' margin='0px,50px' padding='0px' padding_sync='true' border='' border_color='' radius='0px' radius_sync='true' background_color='' src='' attachment='' attachment_size='' background_position='top left' background_repeat='no-repeat' animation='' mobile_display='' av_uid='av-2dgde3y']
[av_image src='https://gestudio.dev/wp-content/uploads/2018/07/Launch-WordPress-on-X10hosting-%E2%80%93-Free-web-hosting-for-WordPress-2.jpg' attachment='5203' attachment_size='full' align='center' styling='no-styling' hover='' link='' target='' caption='' font_size='' appearance='' overlay_opacity='0.4' overlay_color='#000000' overlay_text_color='#ffffff' copyright='' animation='no-animation' av_uid='av-2bkjwla' custom_class='' admin_preview_bg=''][/av_image]
[/av_one_half]

[av_one_half min_height='' vertical_alignment='' space='' custom_margin='' margin='0px' padding='0px' border='' border_color='' radius='0px' background_color='' src='' background_position='top left' background_repeat='no-repeat' animation='' mobile_display='' av_uid='av-29g9uke']
[av_image src='https://gestudio.dev/wp-content/uploads/2020/11/scriptwriterph-technical-support-1.png' attachment='5957' attachment_size='full' align='center' styling='no-styling' hover='' link='page,3483' target='' caption='' font_size='' appearance='' overlay_opacity='0.4' overlay_color='#000000' overlay_text_color='#ffffff' copyright='' animation='no-animation' av_uid='av-28tnlam' custom_class='' admin_preview_bg=''][/av_image]
[/av_one_half]

[av_textblock size='' font_color='' color='' av-medium-font-size='' av-small-font-size='' av-mini-font-size='' av_uid='av-scqmm' custom_class='' admin_preview_bg='']

Install WordPress on X10Hosting – Free WordPress Hosting

[wpb_last_updated_date]

Are you a WordPress developer, a freelancer, or a startup business who wants to launch your WordPress site on production without spending a dime? Now it’s possible with X10Hosting who offers free web hosting for WordPress.

Here in this article, we’ll walk you through the steps on how you can install WordPress on X10Hosting — give you some tips and advice to ease each and every process.

You may ask the question “Why would I install WordPress on X10Hosting?“. There are lots of free WordPress hosting out there such’s Infinityfree, Freehostia, Byethost, and many more. Well, here our primary reason: with X10Hosting you have complete control of your website (you have your own cPanel to create domains and databases, tweak settings, etc.). Also, in our conducted speed test, we’ve discovered that this hosting is much better in terms of speed and performance compared to other free WordPress hosting out there. A default WordPress install with Twentytwenty theme scores 97/100 on mobile and 98/100 on the desktop in Google PageSpeed insights (the server response time is around 200ms). They also have a help center page whenever you need to ask for support. Most importantly, X10Hosting is 100% FREE, and you don’t have to give your credit card details when signing up with them. Visit X10Hosting’s official website here for more information about the features and services they offer.

Requirements

  • Your email
  • A fresh WordPress zip file

[av_hr class=’invisible’ height=’25’ shadow=’no-shadow’ position=’center’ custom_border=’av-border-thin’ custom_width=’50px’ custom_border_color=” custom_margin_top=’30px’ custom_margin_bottom=’30px’ icon_select=’yes’ custom_icon_color=” icon=’ue808′ font=’entypo-fontello’ admin_preview_bg=” av_uid=’av-25aara6′]

Steps to Install WordPress on X10Hosting

[av_hr class=’invisible’ height=’25’ shadow=’no-shadow’ position=’center’ custom_border=’av-border-thin’ custom_width=’50px’ custom_border_color=” custom_margin_top=’30px’ custom_margin_bottom=’30px’ icon_select=’yes’ custom_icon_color=” icon=’ue808′ font=’entypo-fontello’ admin_preview_bg=” av_uid=’av-25aara6′]

Step 1: Create your X10Hosting Account

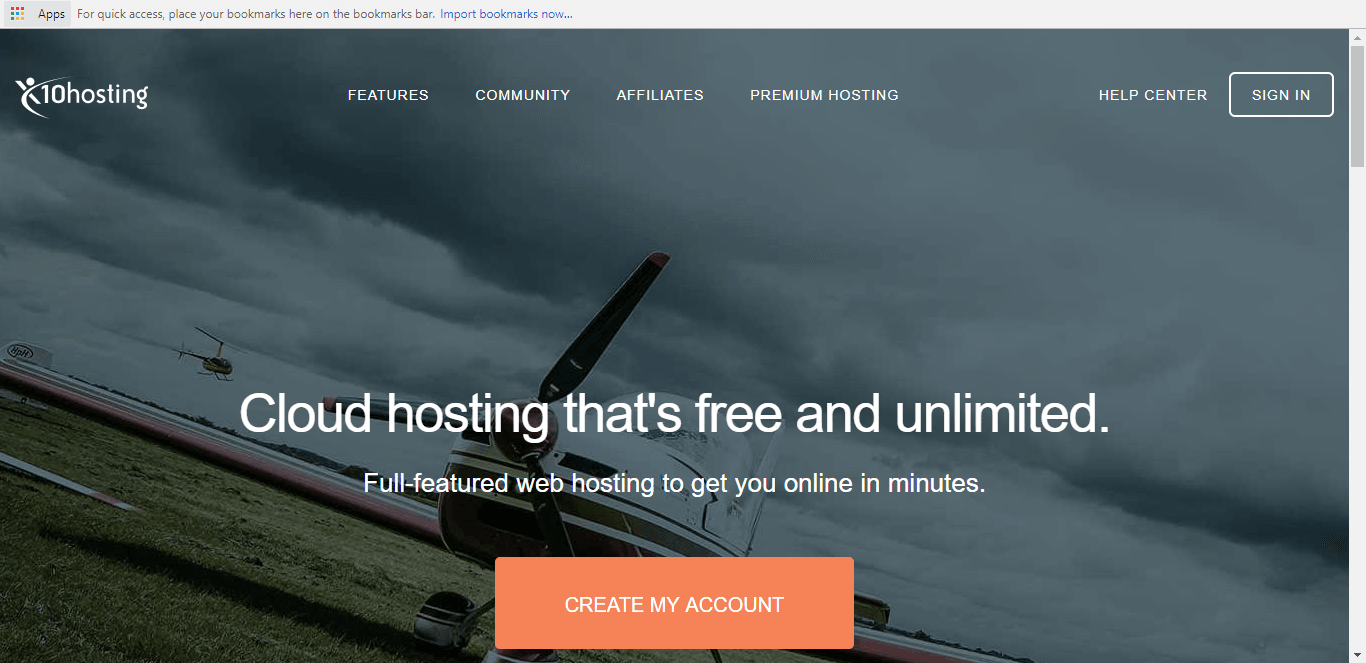
A. First, open your browser and go to the X10Hosting website here.
[adsense_display_ads]

free web hosting for wordpress x10hosting home

[av_hr class=’invisible’ height=’25’ shadow=’no-shadow’ position=’center’ custom_border=’av-border-thin’ custom_width=’50px’ custom_border_color=” custom_margin_top=’30px’ custom_margin_bottom=’30px’ icon_select=’yes’ custom_icon_color=” icon=’ue808′ font=’entypo-fontello’ admin_preview_bg=” av_uid=’av-25aara6′]

B. Next, enter your preferred domain name (e.g. mycooldomain) and click the continue button.

free web hosting for wordpress x10hosting domain

[av_hr class=’invisible’ height=’25’ shadow=’no-shadow’ position=’center’ custom_border=’av-border-thin’ custom_width=’50px’ custom_border_color=” custom_margin_top=’30px’ custom_margin_bottom=’30px’ icon_select=’yes’ custom_icon_color=” icon=’ue808′ font=’entypo-fontello’ admin_preview_bg=” av_uid=’av-25aara6′]

C. Then, provide the email address that you’ll use when signing in to your X10Hosting account.

Hit the continue button to proceed.

free web hosting for wordpress x10hosting email

[av_hr class=’invisible’ height=’25’ shadow=’no-shadow’ position=’center’ custom_border=’av-border-thin’ custom_width=’50px’ custom_border_color=” custom_margin_top=’30px’ custom_margin_bottom=’30px’ icon_select=’yes’ custom_icon_color=” icon=’ue808′ font=’entypo-fontello’ admin_preview_bg=” av_uid=’av-25aara6′]

D. After that, create a strong password.

free web hosting for wordpress x10hosting password

[av_hr class=’invisible’ height=’25’ shadow=’no-shadow’ position=’center’ custom_border=’av-border-thin’ custom_width=’50px’ custom_border_color=” custom_margin_top=’30px’ custom_margin_bottom=’30px’ icon_select=’yes’ custom_icon_color=” icon=’ue808′ font=’entypo-fontello’ admin_preview_bg=” av_uid=’av-25aara6′]

E. Lastly, read the X10Hosting terms of service and check “I Agree“.

Click submit button to proceed.

free web hosting for wordpress x10hosting terms of service agree

[av_hr class=’invisible’ height=’25’ shadow=’no-shadow’ position=’center’ custom_border=’av-border-thin’ custom_width=’50px’ custom_border_color=” custom_margin_top=’30px’ custom_margin_bottom=’30px’ icon_select=’yes’ custom_icon_color=” icon=’ue808′ font=’entypo-fontello’ admin_preview_bg=” av_uid=’av-25aara6′]

F. Now you should receive an email from X10Hosting containing your domain and hosting details.
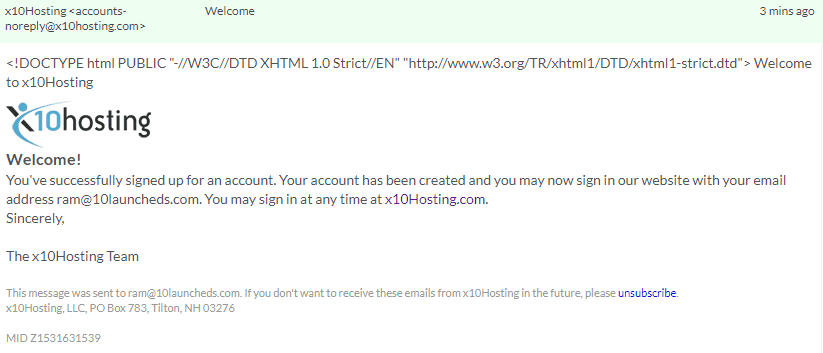
free web hosting for wordpress x10hosting email received

[av_hr class=’invisible’ height=’25’ shadow=’no-shadow’ position=’center’ custom_border=’av-border-thin’ custom_width=’50px’ custom_border_color=” custom_margin_top=’30px’ custom_margin_bottom=’30px’ icon_select=’yes’ custom_icon_color=” icon=’ue808′ font=’entypo-fontello’ admin_preview_bg=” av_uid=’av-25aara6′]

Step 2: Sign-in to X10Hosting & Personalize Your Account
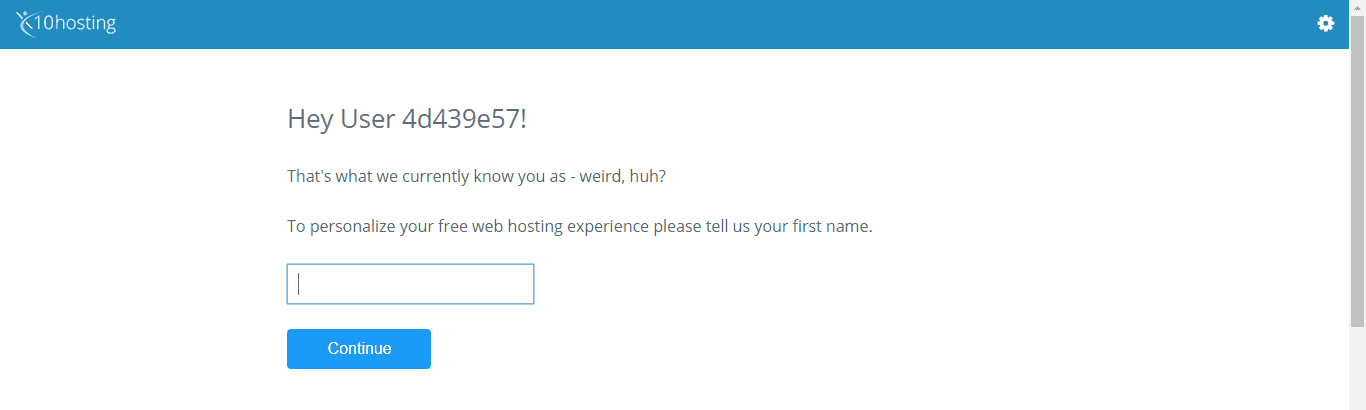
free web hosting for wordpress x10hosting personalize

A. Enter your first name then click continue.

B. Your account will be updated.

Click the continue button to proceed.

C. You’ll receive an email from X10Hosting containing an email confirmation link. Simply click the link to confirm your account.

D. After your account has been confirmed, hit the continue button (you will be redirected to the login page where you have to sign in).

E. Your web hosting account is now ready. X10Hosting will show you your web hosting account details. Take note of those necessary details and keep it secure.

Click open cPanel button, You’ll be redirected to X10Hosting cPanel login page.
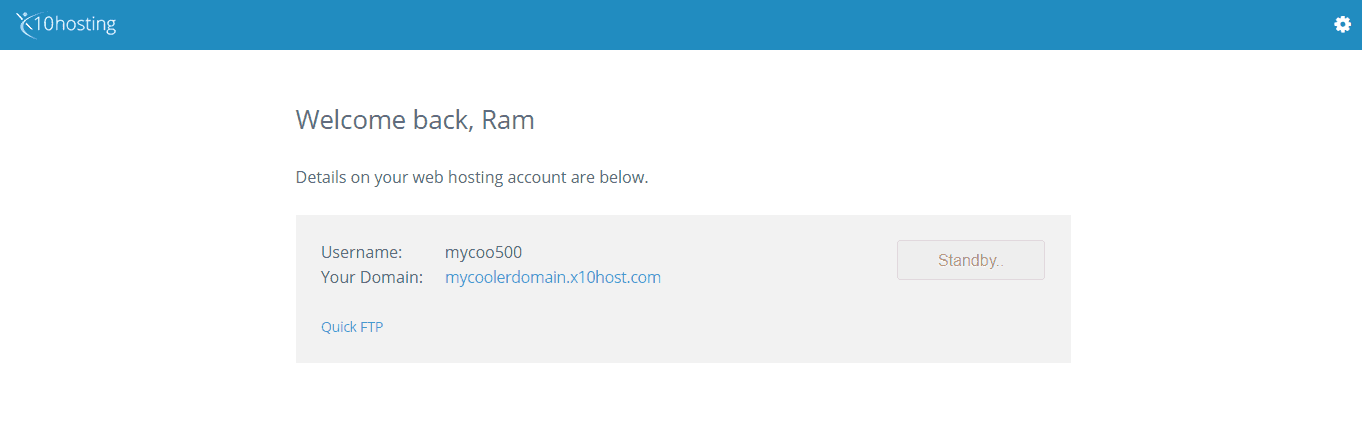
free web hosting for wordpress x10hosting web hosting account

[av_hr class=’invisible’ height=’25’ shadow=’no-shadow’ position=’center’ custom_border=’av-border-thin’ custom_width=’50px’ custom_border_color=” custom_margin_top=’30px’ custom_margin_bottom=’30px’ icon_select=’yes’ custom_icon_color=” icon=’ue808′ font=’entypo-fontello’ admin_preview_bg=” av_uid=’av-25aara6′]

F. Sign in to your cPanel (you’ll be redirected to your control panel page). From there you can start creating your website and upload file/s.

Go and try to play around and explore with your hosting account.
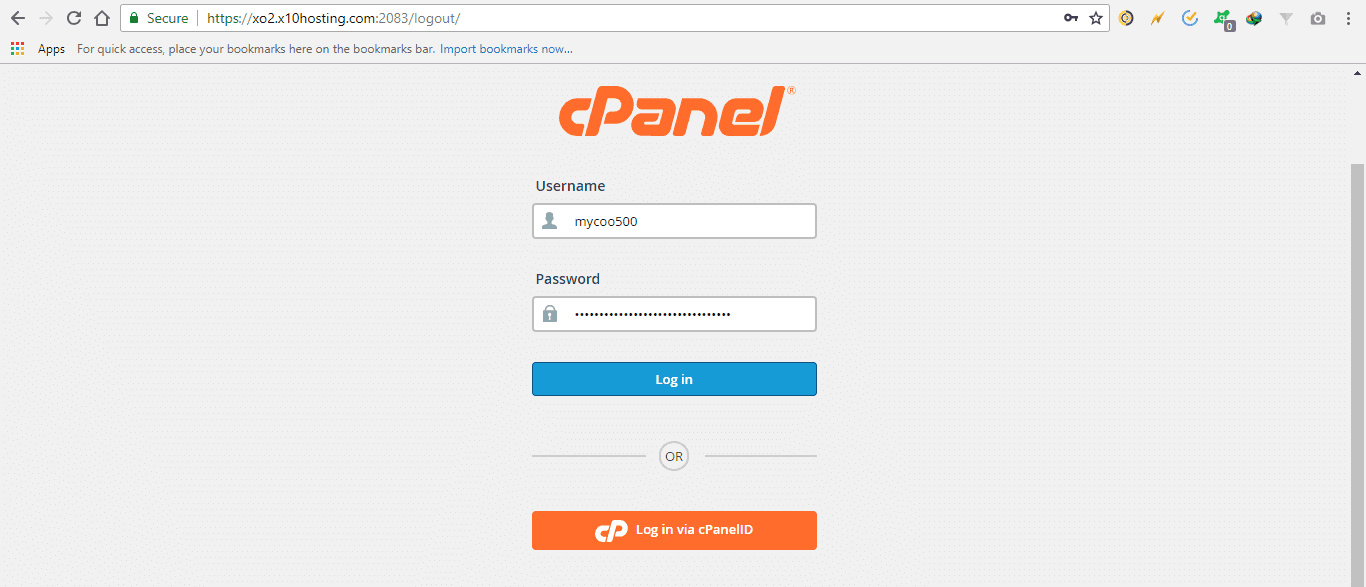
free web hosting for wordpress x10hosting cpanel login

[av_hr class=’invisible’ height=’25’ shadow=’no-shadow’ position=’center’ custom_border=’av-border-thin’ custom_width=’50px’ custom_border_color=” custom_margin_top=’30px’ custom_margin_bottom=’30px’ icon_select=’yes’ custom_icon_color=” icon=’ue808′ font=’entypo-fontello’ admin_preview_bg=” av_uid=’av-25aara6′]

Step 3: Add Your Website from CPanel

A. From cPanel, click Add website button.
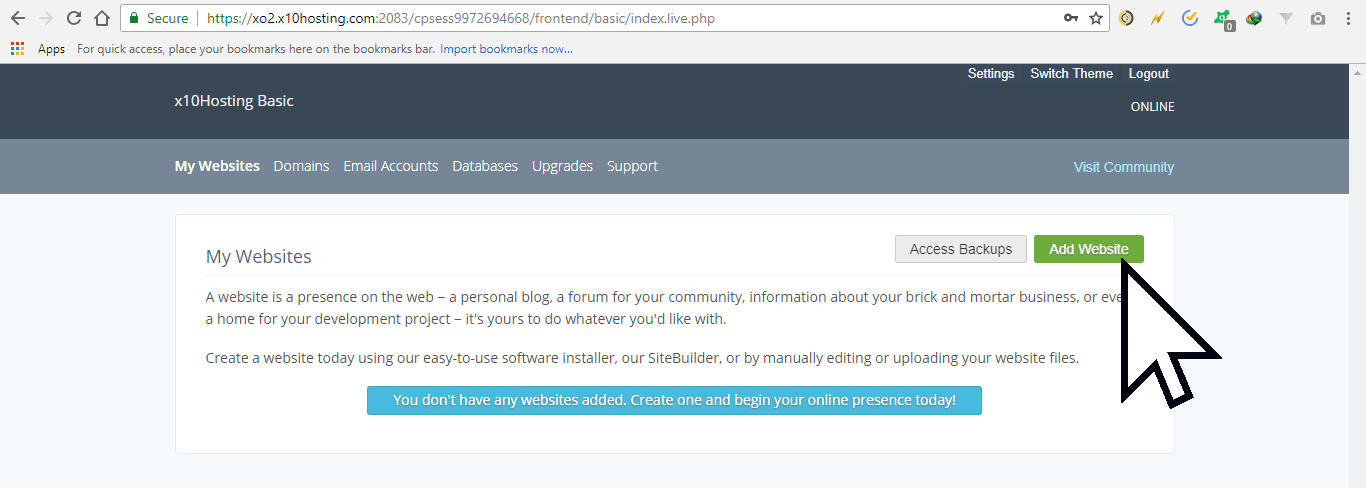
free web hosting for wordpress x10hosting cpanel add website

[av_hr class=’invisible’ height=’25’ shadow=’no-shadow’ position=’center’ custom_border=’av-border-thin’ custom_width=’50px’ custom_border_color=” custom_margin_top=’30px’ custom_margin_bottom=’30px’ icon_select=’yes’ custom_icon_color=” icon=’ue808′ font=’entypo-fontello’ admin_preview_bg=” av_uid=’av-25aara6′]

B. You’ll see 3 options here (Custom website, Use Site Builder, and Software/Script Installer). Select the default option — Custom Website so you’ll have full control of your website files.

Provide the necessary details then click add website.

C. You should see a message “website successfully created” along with your website details.

Click Continue to my website.
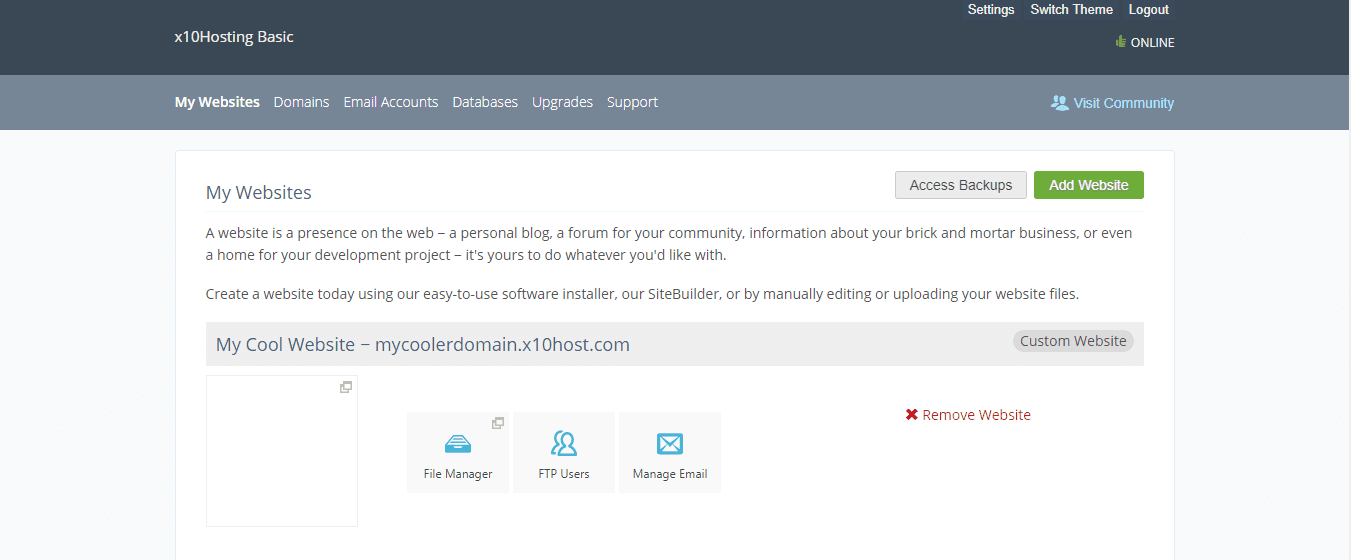
free web hosting for wordpress x10hosting cpanel add website successful

[av_hr class=’invisible’ height=’25’ shadow=’no-shadow’ position=’center’ custom_border=’av-border-thin’ custom_width=’50px’ custom_border_color=” custom_margin_top=’30px’ custom_margin_bottom=’30px’ icon_select=’yes’ custom_icon_color=” icon=’ue808′ font=’entypo-fontello’ admin_preview_bg=” av_uid=’av-25aara6′]

D. Click the file manager icon.

From the file manager, hit the upload icon, tap choose file button then locate your WordPress zip file. You may download wordpress.zip from WordPress.org here if you don’t have one yet. Once you’re done uploading wordpress.zip, hit reload icon to see the file.
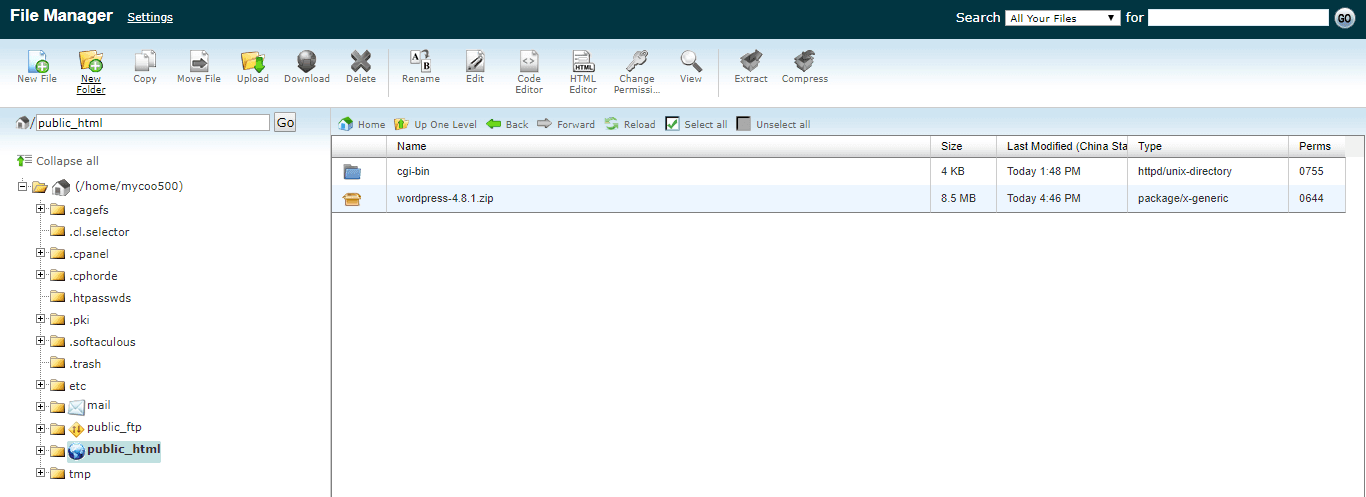
free web hosting for wordpress x10hosting cpanel file manager upload wordpress

[av_hr class=’invisible’ height=’25’ shadow=’no-shadow’ position=’center’ custom_border=’av-border-thin’ custom_width=’50px’ custom_border_color=” custom_margin_top=’30px’ custom_margin_bottom=’30px’ icon_select=’yes’ custom_icon_color=” icon=’ue808′ font=’entypo-fontello’ admin_preview_bg=” av_uid=’av-25aara6′]

E. Extract wordpress.zip.

After extracting the zip file you should see the wordpress folder. All files from wordpress folder should be moved to /public_html.
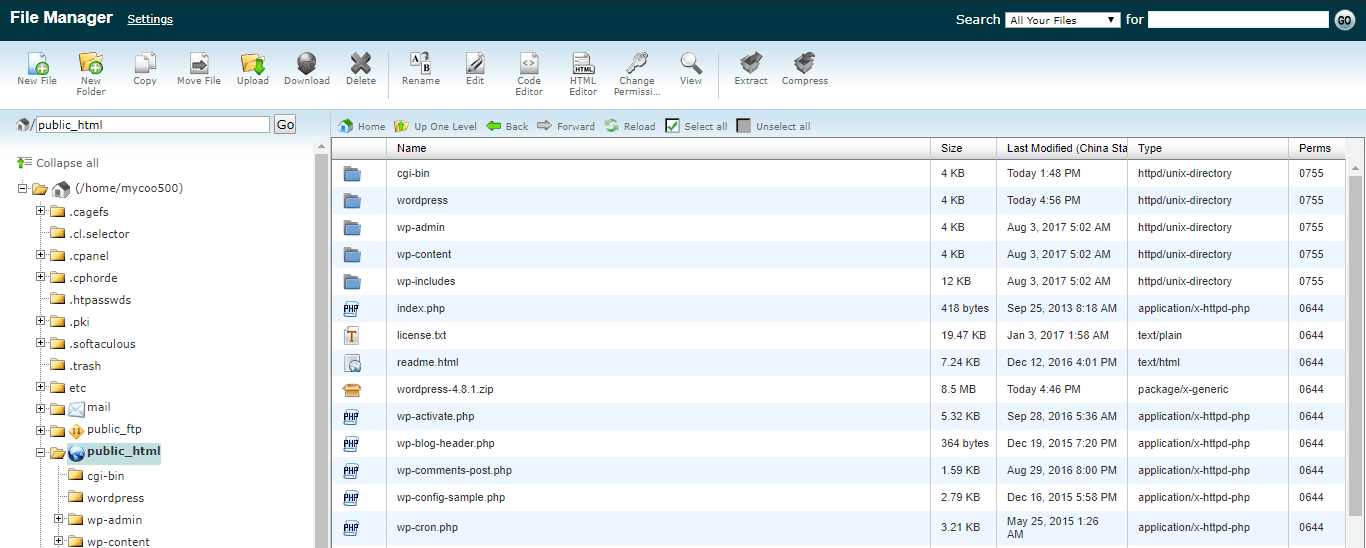
free web hosting for wordpress x10hosting cpanel file manager move wordpress

[av_hr class=’invisible’ height=’25’ shadow=’no-shadow’ position=’center’ custom_border=’av-border-thin’ custom_width=’50px’ custom_border_color=” custom_margin_top=’30px’ custom_margin_bottom=’30px’ icon_select=’yes’ custom_icon_color=” icon=’ue808′ font=’entypo-fontello’ admin_preview_bg=” av_uid=’av-25aara6′]

F. Create a database for your WordPress.

Go back to cPanel’s main page and click Database.

Hit + Add MySQL Database, a pop-up window will show, now enter your database name and click submit.
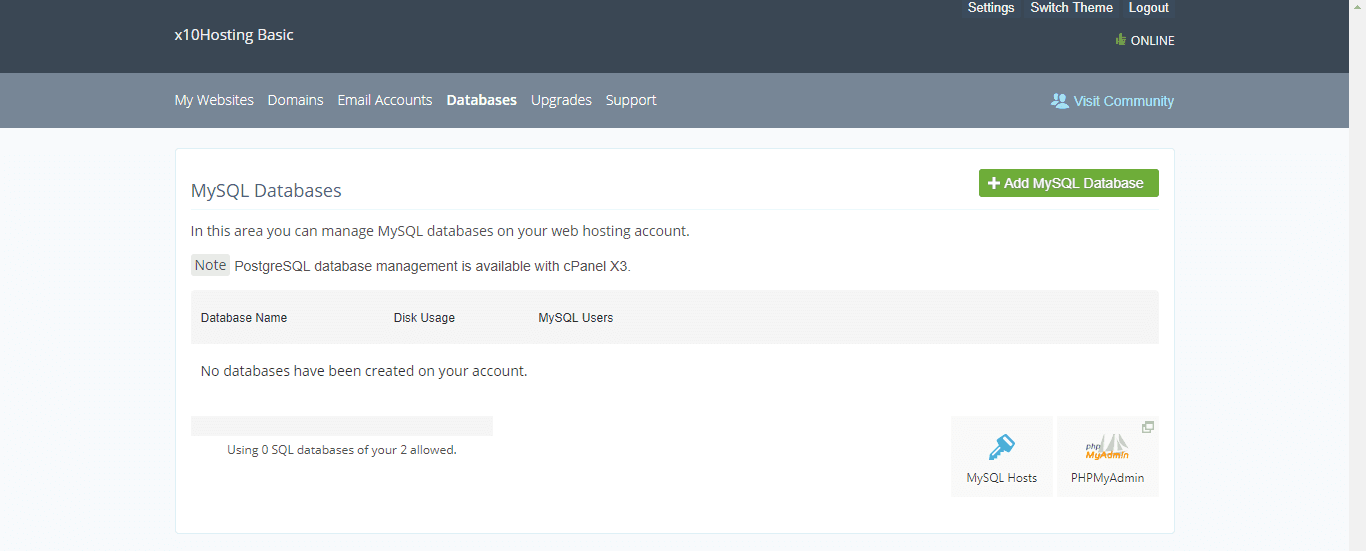
free web hosting for wordpress x10hosting cpanel add mysql database

[av_hr class=’invisible’ height=’25’ shadow=’no-shadow’ position=’center’ custom_border=’av-border-thin’ custom_width=’50px’ custom_border_color=” custom_margin_top=’30px’ custom_margin_bottom=’30px’ icon_select=’yes’ custom_icon_color=” icon=’ue808′ font=’entypo-fontello’ admin_preview_bg=” av_uid=’av-25aara6′]

G. Create your MySQL database user.

A database user will manage the database that we’ve just created.

Click the gear icon and select Manage Users (you’ll be redirected to MySQL Database Users).

Hit + Add user to database to be able to add MySQL database user.

Enter database user and password and click submit button to proceed to Update Database Privileges.

Tick the Grant All Privileges check box then click Update privileges button. “Successfully set privileges” message will show.
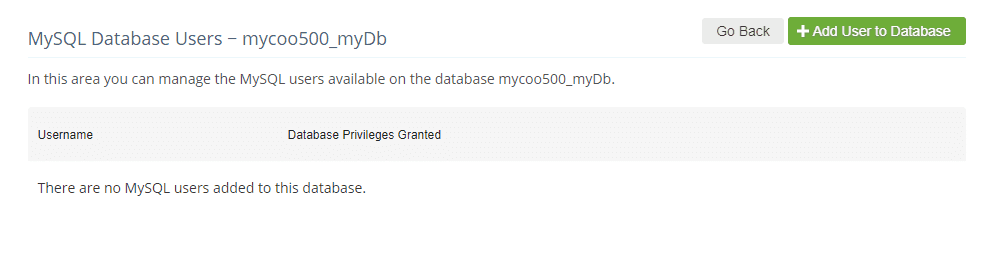
x10hosting cpanel mysql database user add

[av_hr class=’invisible’ height=’25’ shadow=’no-shadow’ position=’center’ custom_border=’av-border-thin’ custom_width=’50px’ custom_border_color=” custom_margin_top=’30px’ custom_margin_bottom=’30px’ icon_select=’yes’ custom_icon_color=” icon=’ue808′ font=’entypo-fontello’ admin_preview_bg=” av_uid=’av-25aara6′]

Step 4: Finally, Install WordPress on X10Hosting!

Now that we’re done settings up everything, we can now begin to install WordPress on X10Hosting.

A. From your browser, go to your site URL (you should see the WordPress install wizard).

Now select your language.

[adsense_display_ads]

B. Read the getting started page and click the Let’s go button.
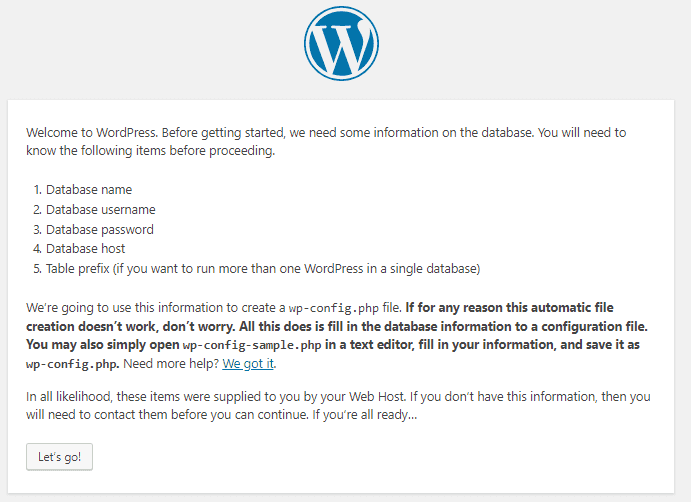
free web hosting for wordpress famous five minute install

[av_hr class=’invisible’ height=’25’ shadow=’no-shadow’ position=’center’ custom_border=’av-border-thin’ custom_width=’50px’ custom_border_color=” custom_margin_top=’30px’ custom_margin_bottom=’30px’ icon_select=’yes’ custom_icon_color=” icon=’ue808′ font=’entypo-fontello’ admin_preview_bg=” av_uid=’av-25aara6′]

C. Enter your database details and click submit button (you should see the “All right, sparky!” message means WordPress can successfully communicate to your database).

Now run the install.
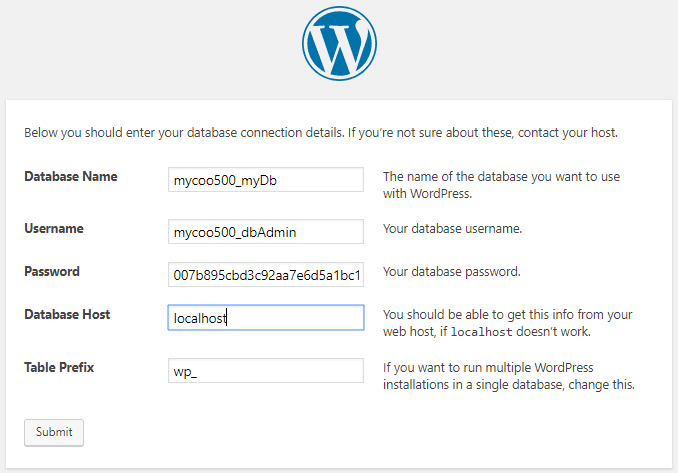
free web hosting for wordpress famous five minute install database details

[av_hr class=’invisible’ height=’25’ shadow=’no-shadow’ position=’center’ custom_border=’av-border-thin’ custom_width=’50px’ custom_border_color=” custom_margin_top=’30px’ custom_margin_bottom=’30px’ icon_select=’yes’ custom_icon_color=” icon=’ue808′ font=’entypo-fontello’ admin_preview_bg=” av_uid=’av-25aara6′]

D. Provide your username/email address and password to sign in.

On successful authentication, the page will redirect you to your WordPress dashboard.

You can now customize your WordPress site, use any WordPress theme you like and add content to your niche.
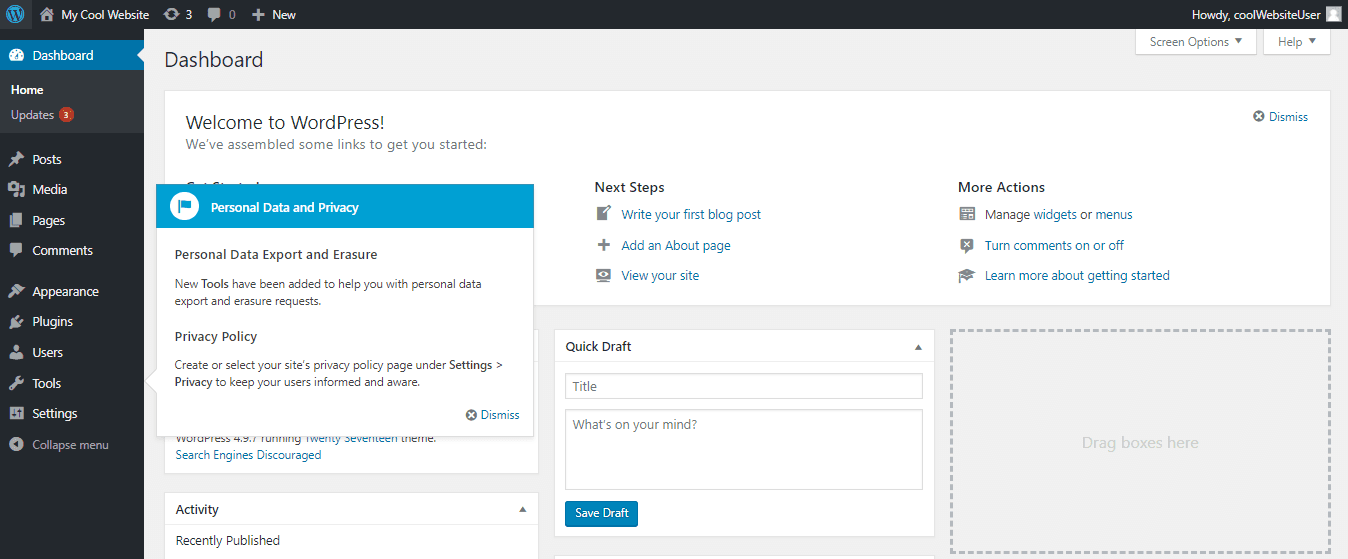
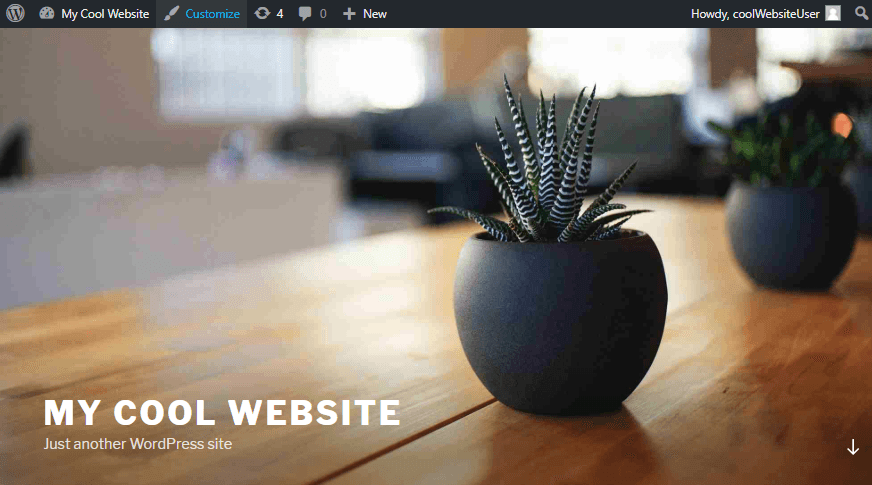
free web hosting for wordpress dashboard

[av_hr class=’invisible’ height=’25’ shadow=’no-shadow’ position=’center’ custom_border=’av-border-thin’ custom_width=’50px’ custom_border_color=” custom_margin_top=’30px’ custom_margin_bottom=’30px’ icon_select=’yes’ custom_icon_color=” icon=’ue808′ font=’entypo-fontello’ admin_preview_bg=” av_uid=’av-25aara6′]

free web hosting for wordpress live online

[av_hr class=’invisible’ height=’25’ shadow=’no-shadow’ position=’center’ custom_border=’av-border-thin’ custom_width=’50px’ custom_border_color=” custom_margin_top=’30px’ custom_margin_bottom=’30px’ icon_select=’yes’ custom_icon_color=” icon=’ue808′ font=’entypo-fontello’ admin_preview_bg=” av_uid=’av-25aara6′]

Well done! You have successfully installed your WordPress site on X10Hosting.

If you want a dedicated web hosting server for your site, you may choose Bluehost — the most reliable web hosting server for WordPress. You can follow our complete guide here on launching a WordPress site on Bluehost and get 63% off.

Another choice is launching your site on an unmanaged server (such as Google Cloud Platform, AWS, etc.). You may follow our steps here on manual migrating WordPress sites on unmanaged servers.

That’s all fellas. We hope this written article on installing WordPress on X10Hosting helped you get your WordPress up and running in production without spending money.

[av_hr class=’invisible’ height=’25’ shadow=’no-shadow’ position=’center’ custom_border=’av-border-thin’ custom_width=’50px’ custom_border_color=” custom_margin_top=’30px’ custom_margin_bottom=’30px’ icon_select=’yes’ custom_icon_color=” icon=’ue808′ font=’entypo-fontello’ admin_preview_bg=” av_uid=’av-25aara6′]
[/av_textblock]

[av_social_share title=’SHARE THIS POST’ style=’minimal’ buttons=” admin_preview_bg=” av_uid=’av-6ez6xq’]

[av_hr class=’invisible’ height=’50’ shadow=’no-shadow’ position=’center’ custom_border=’av-border-thin’ custom_width=’50px’ custom_border_color=” custom_margin_top=’30px’ custom_margin_bottom=’30px’ icon_select=’yes’ custom_icon_color=” icon=’ue808′ font=’entypo-fontello’ admin_preview_bg=” av_uid=’av-3vt32m’]

[av_comments_list av_uid=’av-31mepa’]