
Are you using VTiger CRM and need to connect to a third party application? It is often a requirement in a CRM to have the capability to talk to external systems. External systems are those system that isn’t hosted from your CRM server. A website hosted on a different server is a good example. In a website you commonly place your subscription forms, contact forms and other kind of forms. That’s actually a good business strategy to have external sources to gather more customers and to grow your network. How could you save data from external sources to your VTiger CRM database? Using what we call VTiger API, interconnection between your Vtiger CRM and third party applications becomes possible and easy.
You need to use VTiger API whether your syncing data or sharing information from a third party app to your VTiger CRM. Lucky us to have this VTiger CRM developers guide on third party app integration (REST APIs).
Before taking any action, we’re strongly suggesting you to backup your VTiger files and database first. It is also advisable to upgrade your VTiger CRM before integrating to a third party app for a better performance, improve security and fix bugs.
Requirements
- Your VTiger CRM
- Access to your VTiger CRM files
Flowchart – How VTiger API Works
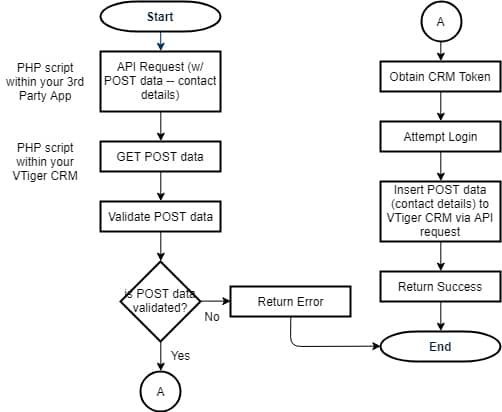
To demonstrate how VTiger API works we created a simple flowchart that will add contact details from external source to your VTiger CRM.
PHP Code to Place within Your VTiger CRM
This is the source code to place within your VTiger CRM. Your third party app will call this script for them to be able to create contact on your VTiger CRM. Create folder api to your VTiger root directory. Create index.php file inside of api folder and paste the following code.
<?php // is POST a request ? if ($_POST) { // get POST data from API request $vt_usr = $_SERVER['PHP_AUTH_USER']; $vt_pw = $_SERVER['PHP_AUTH_PW']; $vt_usr_key = $_POST['vt_usr_key']; $fname = $_POST['firstname']; $lname = $_POST['lastname']; $title = $_POST['title']; $email = $_POST['primary_email']; $phone = $_POST['office_phone']; $points = $_POST['points']; // initialize variables $validated = true; $message = array(); // Contact details to be inserted $params = array( 'firstname' => $fname,
 'lastname' => $lname,
'email' => $email,
'title' => $title,
'phone' => $phone,
'assigned_user_id' => 'administrator'
);

// validate POST data
if ( empty($vt_usr) || empty($vt_pw) || empty($vt_usr_key) ) {
$validated = false;
array_push($message, "Authentication failed");
}

if ( (!preg_match("/^[A-Za-z\- ']+$/", $fname))
|| (empty($fname)) ) {
$validated = false;
array_push($message, "Invalid firstname");
}

if ( (!preg_match("/^[A-Za-z\- ']+$/", $lname))
|| (empty($lname)) ) {
$validated = false;
array_push($message, "Invalid lastname");
}

if ( (!filter_var($email, FILTER_VALIDATE_EMAIL))
|| (empty($email)) ) {
$validated = false;
array_push($message, "Invalid email");
}

// is POST data validated ?
if ( $validated ) {

// Obtain CRM Token
$serveraddress = 'http://springcrmv.crms.pro';
$crm_username = $vt_usr;
$crm_userpassword = $vt_pw;
$crm_useraccesskey = $vt_usr_key;

$token_url = $serveraddress."/webservice.php?operation=getchallenge&username=".$crm_username;
$token_data = json_decode(file_get_contents($token_url));

if ($token_data->success != 1) die('Access denied');

$crm_token = $token_data->result->token;

// Attempt Login
$service_url = $serveraddress."/webservice.php";
$curl = curl_init($service_url);
$curl_post_data = array(
'operation' => 'login',
'username' => $crm_username,
'accessKey' => md5($crm_token.$crm_useraccesskey),
);

curl_setopt($curl, CURLOPT_RETURNTRANSFER, true);
curl_setopt($curl, CURLOPT_POST, true);
curl_setopt($curl, CURLOPT_POSTFIELDS, $curl_post_data);

$curl_response = json_decode(curl_exec($curl));

if ($curl_response->success != 1) die('Invalid user credentials');

$crm_session = $curl_response->result->sessionName;

// Create Contact through API POST request
$curl1 = curl_init($service_url);

$objectJson = json_encode($params);
$moduleName = 'Contacts';
$curl_post_data1 = array(
'sessionName' => $crm_session,
'operation' => 'create',
'element' => $objectJson,
'elementType' => $moduleName,
);

curl_setopt($curl1, CURLOPT_RETURNTRANSFER, true);
curl_setopt($curl1, CURLOPT_POST, true);
curl_setopt($curl1, CURLOPT_POSTFIELDS, $curl_post_data1);

$curl_response1 = json_decode(curl_exec($curl1));

array_push($message, "Success");
}

// response to display
$response = array(
'status' => 200,
'payload' => $params,
'input_validated' => $validated,
'message' => $message
);

echo json_encode($response);
}
?>
Source Code Explanation
Line 4: Determine whether the API request is a POST request.
Line 6: Get POST data from API request of the third party application.
Line 23: Initialize params (parameters) — data fields to be inserted to your VTiger CRM using VTiger API.
Line 33: Validate POST data received from API request.
Line 59: If all POST data are validated then the program will proceed on obtaining CRM token. CRM token is required when attempting to login to VTiger. Your login session is required when you’re trying to request to VTiger API.
Line 75: Attempt to authenticate VTiger credentials.
Line 94. Finally, call your VTiger web service with POST data. Contact details should be inserted to your VTiger CRM database.
PHP Code to Place within Your Third-party Application
This is the PHP script to place within your third-party app. This PHP script is responsible to call the first script that we have created.
<?php // initialize your API URL $api_url = "http://springcrmv.crms.pro/api/index.php"; $curl = curl_init($api_url); /* This is your VTiger CRM credentials and access token. Store this information to your database for security purposes. */ $username = 'your-username'; $password = 'your-password'; $key = 'your-access-key'; // access key required, to get your access key login to your Vtiger CRM. Go to ‘My Preferences’, you should see your access key below. /* Sample Payload This is your contact details */ $payload = array( 'vt_usr_key' => $key,
 'firstname' => 'firstname',
'lastname' => 'Lastname',
'title' => 'Title',
'primary_email' => 'firstname.lastname@gmail.com',
'office_phone' => '123-4567',
);

// Call the PHP script that we have created earlier
curl_setopt($curl, CURLOPT_RETURNTRANSFER, true);
curl_setopt($curl, CURLOPT_POST, true);
curl_setopt($curl, CURLOPT_POSTFIELDS, $payload);
curl_setopt($curl, CURLOPT_USERPWD, $username.':'.$password);

// print the cURL response
echo "cURL Response
";
echo '
<pre>';
	print_r(curl_exec($curl));
	echo '</pre>
';
?>
Source code explanation
Line 3: Initialize API URL — this is your VTiger CRM URL plus the location of the PHP script that we have created earlier.
Line 12: Initialize your VTiger CRM credentials and access token. You may store this kind of information to a database for security purposes. To get your access key login to your Vtiger CRM. Go to My Preferences, you should see your access key below.
Line 20: Prepare your contact details. This details can be from your website contact forms or subscription forms.
Line 29: Call the PHP script that we have created earlier. The script that we have created earlier will receive POST fields and will validate them. If POST data are all validated it will be inserted to your VTiger CRM Contacts.
Finally, Test VTiger API
For testing, you can use Postman to send a POST request with POST data.
To check if the script is working, login to your VTiger CRM and navigate to Contacts. You should see the newly created contact from your VTiger CRM.
We hope you make VTiger API works between your VTiger CRM and your third party app.
You may also read VTiger Dynamic Fields And Blocks Using Javascript/JQuery.
Good Post. This is Useful for me and it is also working .
Hi glenn,
How to update contact Detail through REST API.I try through API But error comes.
{“status”:200,”payload”:{“id”:13,”firstname”:”Raman”,”lastname”:”Kumar”,”email”:”ashKK@rr.com”,”title”:””,”phone”:”878606789″},”input_validated”:true,”message”:[{“success”:false,”error”:{“code”:”ACCESS_DENIED”,”message”:”Permission to perform the operation is denied”}}]}
Please Help.
Hi Glenn
I am getting the success message OK but the details are not being posted to the database…
Any ideas
N
Sorted – if you have mandatory fields other than those you use in the script – they obviously need to be added.
I added (after $curl_response1 = json_decode(curl_exec($curl1));)
echo “Curl response “;
print_r($curl_response1);
echo “”;
to identify those fields
Thanks – great script
Nick
Hi Nick, glad it works!
How could this be adapted so that it updates contacts that are already in the database based say on email?
N
Hi Nick, I honestly haven’t tried that yet, but I believe you’ll be able to update your contacts that are already in your database through VTiger API by writing a separate webservice update function (https://www.vtiger.com/docs/rest-api-for-vtiger#/Update). I haven’t written webservice update function code; I see fewer/limited examples from VTiger REST API documentation, so you might need to undergo trial and error.
Hello,
Thank you for this valuable information for vtiger.
I would like to use the “convertlead” webservice in php.
https://help.vtiger.com/article/147111249-Rest-API-Manual#articleHeader21
But I can’t find php code examples, I tried a lot of tests but I still have an http 412 error code.
Also I will be happy to find people who have done this sort of thing.
I use the online vtiger version as in the documentation:
The base-url or endpoint of API will be specific to your CRM instance.
Example: https://your_instance.odx.vtiger.com/restapi/v1/vtiger/default
I use other services without soi = uci like “query” for example.
Sorry for my bad english, i’m french.
Thank you.